最近恰好遇到一个需要频繁签到的系统,为了省下周末还要惦记着却还总是忘记签到的精力,宁可花点时间整个自动签到脚本
原本是想用可以打包成可执行文件的 Python 写的!可是吧,好久没写 Python 了,而且需要引用网络网络请求包,想来也不那么简洁,干脆用我的拿手语言 JavaScript 得了
初版,实现自动签到
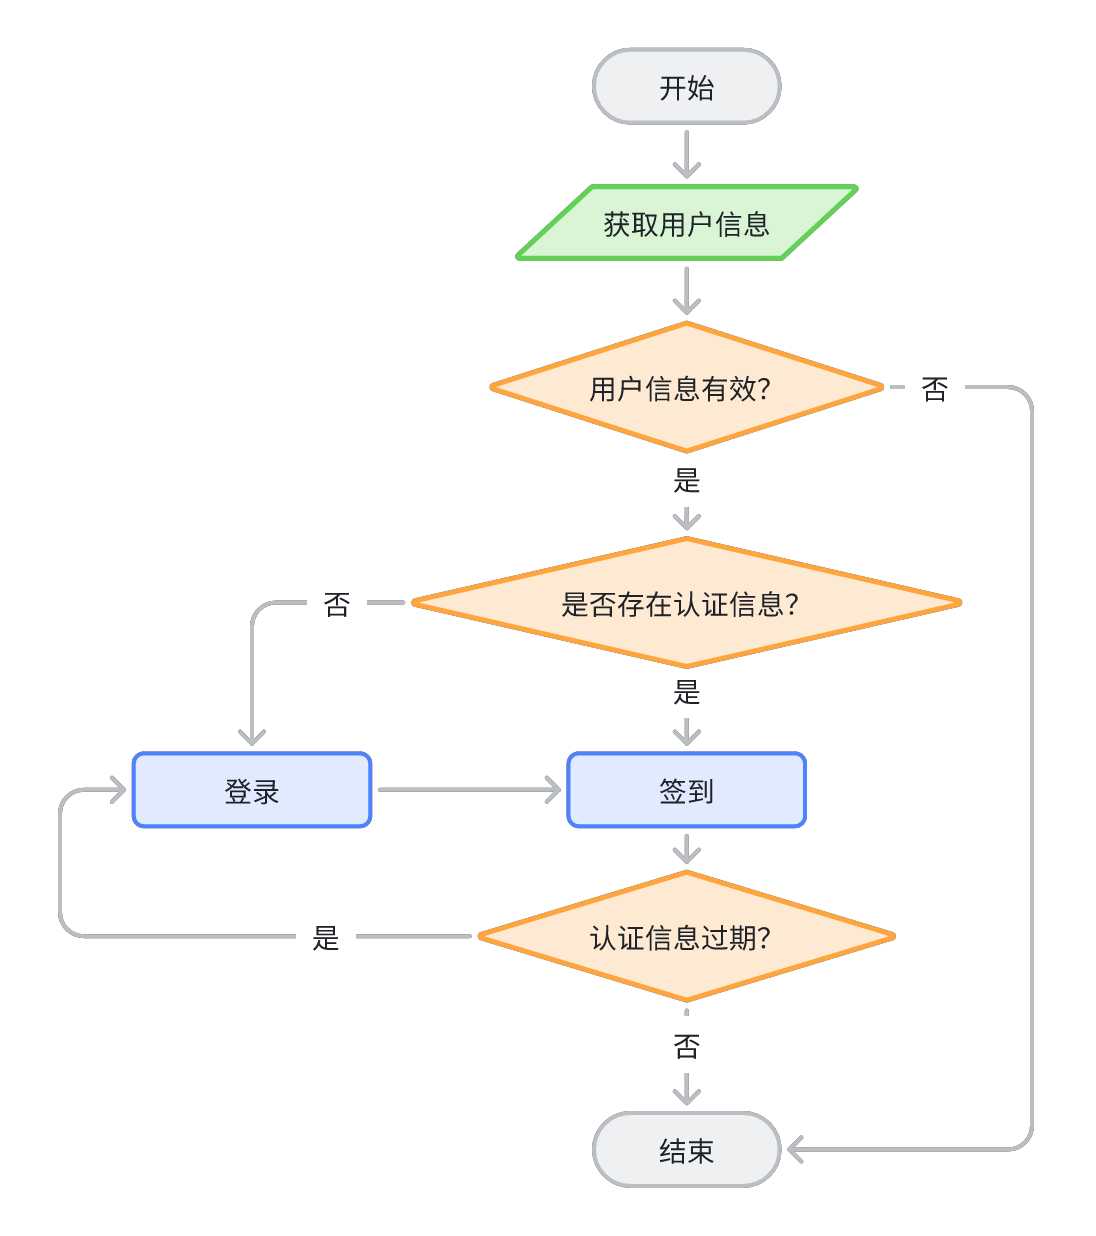
首先映入眼帘的是网络请求使用 axios,核心其实就两个接口调用,签到 + 登录,首先画出签到流程图如下
封装 axios
对于网络请求部分,一般情况下,认为登录和签到是同一个系统,有统一的请求和响应格式。使用 axios 的实例,可以一次配置,多次使用,于是配置 axios 实例及拦截器如下
1 2 3 4 5 6 7 8 9 10 11 12 13 14 15 16 17 18 19 20 21 22 23 24 25 26 27 28 29 30 31 32 33 34 35 36 37 38 39 40 41 42 43 44 45 46 47 48 49 50 51 const axios = require ("axios" );const { logError, logInfo } = require ("./log" );const { getToken } = require ("./token" );const addRequestInterceptors = function (instance ) { instance.interceptors .request .use (function (request ) { const token = userInfo.token || getToken (userInfo.account ); if (token) { if (!request.headers ) { request.headers = {}; } request.headers .Token = token; } return request; }); }; const addResponseInterceptors = function (instance ) { instance.interceptors .response .use ( function (response ) { return response; }, function (error ) { if (error.response && [401 ].includes (error.response .status )) { loginAndSign (instance) } else { logError ("" + error, userInfo.account ); process.exit (1 ); } } ); }; const initAxios = function ( const instance = axios.create ({ baseURL : "https://demo/api" , timeout : 60 * 1000 , headers : { "Content-Type" : "application/json" , }, }); addRequestInterceptors (instance); addResponseInterceptors (instance); return instance; };
其中的logError、logInfo、getToken方法是从文件系统中读写认证信息或写入格式化的日志信息的方法,实现比较简单,这里不赘述
userInfo对象携带了用户的核心信息,基本格式可以如下
1
2
3
4
5
interface UserInfo { account : string password : string token?: string }
登录 + 签到
接下来编写核心的两个请求方法,很简单,直接调用上述生成的 axios 实例并处理接口数据即可,如下
1 2 3 4 5 6 7 8 9 10 11 12 13 14 15 16 17 18 19 20 21 22 23 24 25 26 27 28 29 30 31 32 33 34 35 36 37 38 39 40 41 42 43 44 45 46 47 48 const { writeToken } = require ("./token" );const loginIn = function (axiosInstance ) { return axiosInstance .post ("/login" , { account : userInfo.account , password : userInfo.password , }) .then ((resp ) => { if (resp.data .code !== "ok" || !resp.data .data ) { throw new Error (resp.data .message ); } else { writeToken (userInfo.account , resp.data .data .token ); userInfo.token = resp.data .data .token ; logInfo (`以${userInfo.account} 身份登录成功` , userInfo.account ); } }) .catch ((err ) => { logError ( `以${userInfo.account} 身份登录失败,错误${"" + err} ` , userInfo.account ); throw new Error (err); }); }; const sign = function (axiosInstance ) { axiosInstance .get ("/sign" ) .then ((resp ) => { if (resp.data .code !== "ok" ) { if (resp.data .bizCode === "3007" ) { logInfo ("今天已经签到过了" , userInfo.account ); } else { logError ("签到失败: " + resp.data .message , userInfo.account ); } } else { logInfo ("签到成功" , userInfo.account ); } }) .catch ((err ) => { const message = "签到出错: " + err logError (message, userInfo.account ); }); };
架构
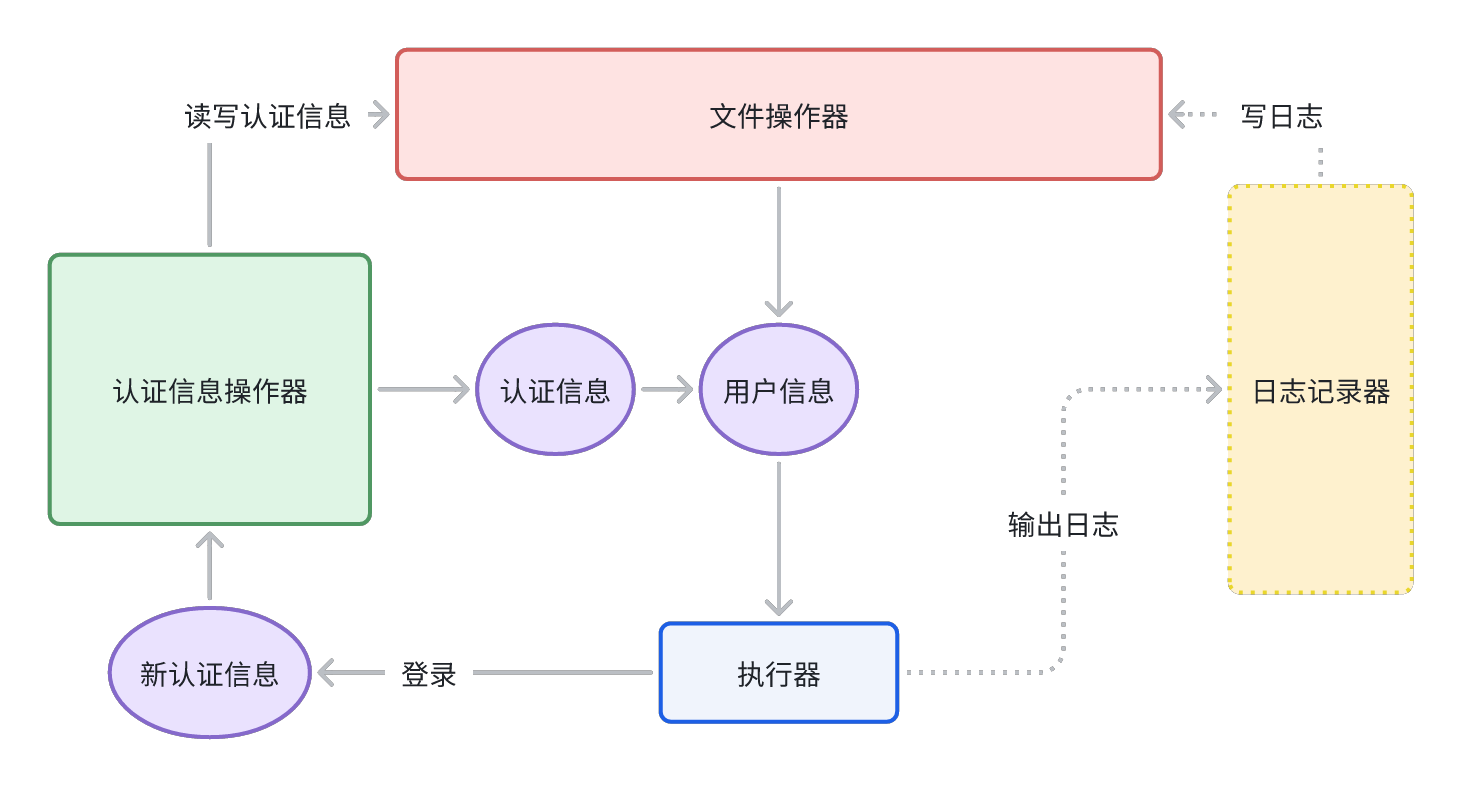
总结一下上述的架构,得到如下的架构图
其中的认证信息操作器和日志记录器均依赖于文件操作器,读写认证信息缓存和写入日志
图中虚线部分的日志模块可以省略,使用 linux 系统自带的 stdin 和 stdout 替代即可
从文件中读入预先定义好的用户信息(UserInfo),混合可能存在的认证信息,传入执行器(sign.js)并执行自动签到,如果执行了登录操作,则将新获取的认证信息写回认证信息操作器做缓存
其他
在实际操作中,由于UserInfo需要直接从预定义的文件中获取,但是这样的文件一定不可以在开发阶段提交 git,由是引入类似 webpack 的环境信息文件加载机制:以['user-info.local.json', 'user-info.json']的顺序读入用户信息,在开发阶段只定义.local.json文件内容,并且用 .gitignore 忽略提交,而不定义后者,后者提交一个包含UserInfo对象格式的空数据文件。在实际线上部署时,再定义 user-info.json 的内容。代码如下
1 2 3 4 5 6 7 8 9 10 11 12 13 14 15 16 17 18 19 20 const loadUserInfo = function ( let user = {}; const chain = [".local" , "" ]; chain.some ((suffix ) => { try { readUser = require (`./user-info${suffix} .json` ); if (!readUser) return ; user = readUser return true ; } catch (e) {} }); if (!user || !user.length ) { const error = "用户信息缺失" ; logError (error); process.exit (1 ); } return user; };
再版,满足多用户登录
刚才的架构下,已经可以满足单人自动签到,但是实际场景下,需要同时签到的可能不止一个用户,原本的UserInfo对象已经无法满足需求,因而需要对架构做出简单的调整
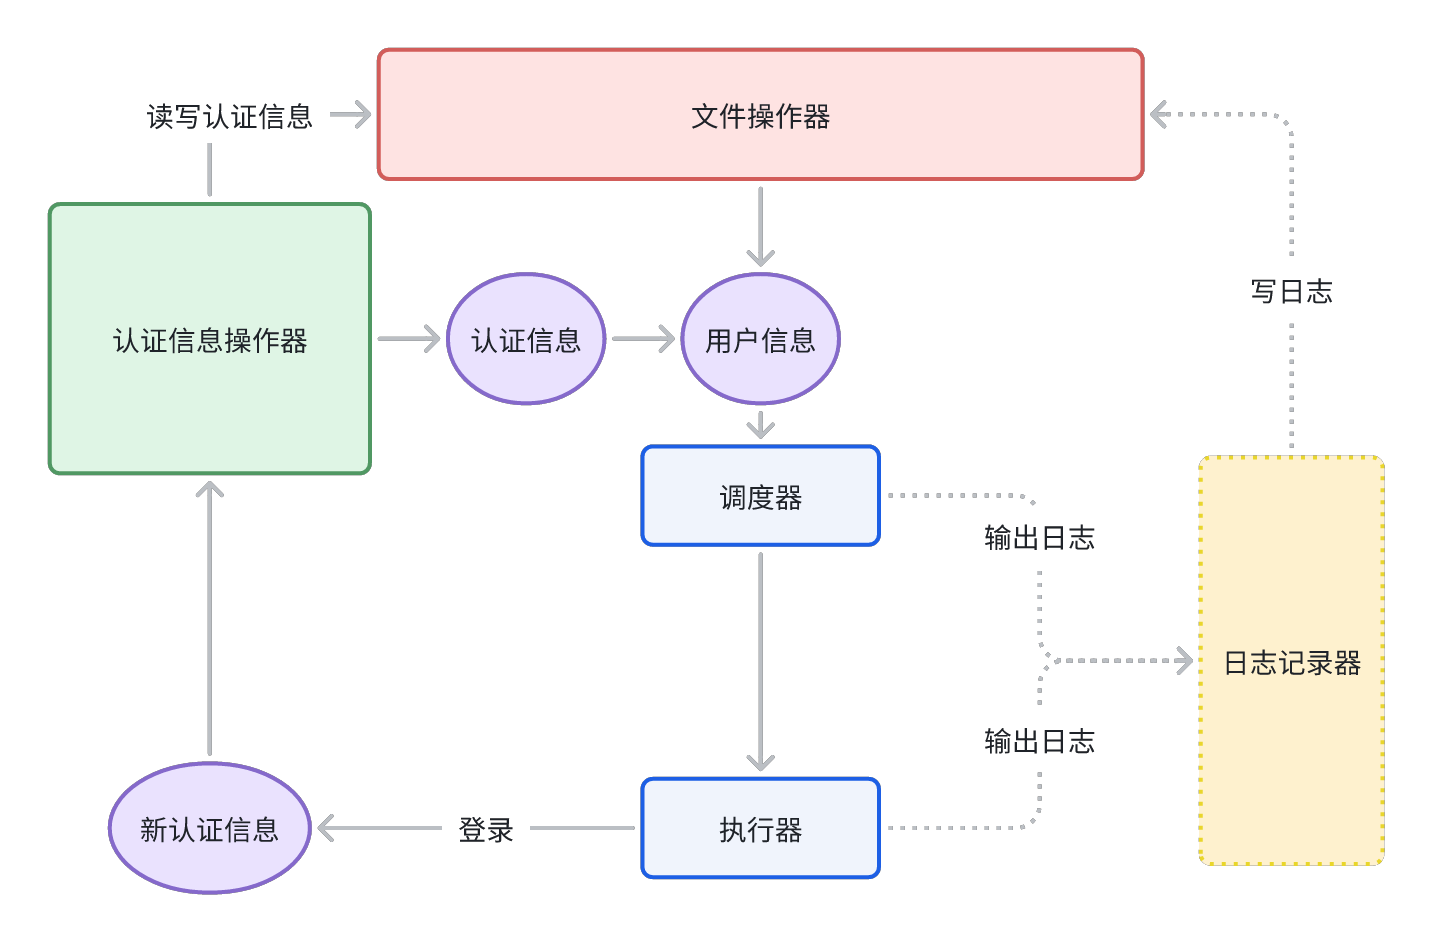
加入一个调度器(schedule.js),批量读入用户信息,使用shelljs在脚本中定义子进程任务,启动执行器(sign.js)并传入单个用户信息
于是架构图修改如下
调度器核心代码如下
1 2 3 4 5 6 7 8 9 10 11 12 13 14 15 16 17 18 19 20 21 22 23 24 25 26 27 28 29 30 31 32 33 34 35 36 37 38 39 40 41 42 43 44 45 46 const path = require ("path" );const shelljs = require ("shelljs" );const { logError } = require ("./log" );const { getTokens } = require ("./token" );const signPath = path.resolve (__dirname, "./sign.js" );const loadUserInfo = function ( let users = []; const chain = [".local" , "" ]; chain.some ((suffix ) => { try { readUsers = require (`./user-info${suffix} .json` ); if (!readUsers) return ; if (!Array .isArray (readUsers)) { users = [readUsers]; } else { users = readUsers; } return true ; } catch (e) {} }); if (!users || !users.length ) { const error = "用户信息缺失" ; logError (error); process.exit (1 ); } return users; }; const doLoginEveryUser = function (users ) { const tokens = getTokens (); users.forEach ((user ) => { shelljs.exec ( `node ${signPath} ${user.account} ${user.password} ${ tokens[user.account] || "" } ` { async : true } ); }); }; const users = loadUserInfo ();doLoginEveryUser (users);
其中的读取用户信息已经改为适配用户信息数组的格式
自动执行
自动执行依赖 linux 的 crontab 命令,思路为:读取当前用户已经设定的所有自动任务到一个缓存文件,追加入自动执行调度器的任务命令,再使用 crontab 命令按照该缓存文件内容,重新生成所有自动任务,最后删除该缓存文件,假设此脚本名为script/auto.sh,代码如下
1
2
3
4
5
#!/bin/bash crontab -l > conf echo "10 0 * * * node `pwd`/schedule.js" >> conf crontab conf rm -f conf
三版,增加通知
增加通知首先要编写通知代码,此处使用简单的飞书群组自定义机器人发送通知,这样可以最简单且无需鉴权地完成通知,示例代码如下
要实现别的通知,只需要自定义notifyByLarkBot这类方法
1 2 3 4 5 6 7 8 9 10 11 12 13 14 15 16 17 18 19 20 21 22 23 24 25 26 27 28 29 30 31 32 33 34 35 36 37 38 39 40 41 42 43 44 45 const axios = require ("axios" );const { logError, logInfo } = require ("./log" );const notifyByLarkBot = function (message ) { axios .post ( "https://open.feishu.cn/open-apis/bot/v2/hook/***" , { msg_type : "text" , content : { text : message, }, } ) .then ((resp ) => { if (resp.data .code === 0 ) { logInfo ("通知发送成功:" + message); } else { logError ("通知发送失败:" + message); } }) .catch ((error ) => { logError ("通知发送失败:" + message); }); }; const formatMessage = function (users, success = true ) { return `${users.join("、" )} 签到${success ? "成功" : "失败" } ` ; }; const notify = function (users, success = true ) { if (!users || !users.length ) return ; notifyByLarkBot ( formatMessage ( users.map ((item ) => item.name || item.account || item), success ) ); }; module .exports = { notify, };
此时为了在通知中显示有意义的用户名称,而不仅仅是账号,修改UserInfo对象为:
1
2
3
4
5
6
7
8
9
interface UserInfo = { account : string password : string token?: string name?: string disableNotify?: boolean }
在调度器的核心代码中,需要获取子进程的执行状态。恰好shelljs.exec()支持传入第三个参数,为异步回调方法。于是使用一个 Promise 对象包裹子进程,在回调中满足或拒绝此 Promise 对象,在所有 Promise 对象设定状态后,按照成功和失败分组,并分别调用通知方法即可,修正的调度器代码如下
1 2 3 4 5 6 7 8 9 10 11 12 13 14 15 16 17 18 19 20 21 22 23 24 25 26 27 28 29 30 31 32 33 34 35 36 37 38 39 40 const doLoginEveryUser = function (users ) { const all = []; const tokens = getTokens (); users.forEach ((user ) => { all.push ( new Promise ((resolve, reject ) => { shelljs.exec ( `node ${signPath} ${user.account} ${user.password} ${ tokens[user.account] || "" } ` { async : true }, function (code ) { if (code === 0 ) { resolve (user); } else { reject (user); } } ); }) ); }); Promise .allSettled (all).then ((result ) => { const success = result .filter ( (r ) => r.status === "fulfilled" && r.value && !r.value .disableNotify ) .map ((r ) => r.value ); const fail = result .filter ( (r ) => r.status === "rejected" && r.reason && !r.reason .disableNotify ) .map ((r ) => r.reason ); notify (success); notify (fail, false ); }); };
其他
此脚本依赖 nodejs >= 16,主要原因是要使用pnpm管理依赖包,理论上其他主要的 nodejs 版本也可以运行。而当 nodejs >= 20.6.0 时,nodejs 原生支持 .env 文件,上述的用户环境信息机制也可直接使用此机制替代
下载此脚本项目后,首先执行pnpm i安装所需依赖包,然后开启自动任务./script/auto.sh。也可以手动执行调度器执行一次签到node ./schedule.js


 Mosu is located on the shore of Mosu Lake, facing the vast Chu Sea, backed by the Yihan Mountains. Thousands of miles of Mosu Desert can not erode the Mosu Valley. Thus the Mosu Empire was established.


